Lists
The Lists menu allows you to create and manage your organization’s master data. This is the foundational information that supports the day-to-day operations of your business processes. The List Menu consists of following items:
- Users
- Accounts
- HSN Code
- Product Groups
- Products
- Price List
- Discount List
## Users
The User List is a core administrative module where you can view, manage, and control access for every user registered in the system. It ensures that each user has the appropriate roles, rights, and permissions to perform specific actions based on their responsibilities.
 If a user does not already have an account in the system, you will need to create one for them.
To do this, click on the red circular button shown in the image above. This button is used to initiate the creation of a new user account.
The steps shown in the image above guide you through the process of creating a new user in the system. Follow the instructions below carefully:
Step 1: Select User Type
Begin by selecting the User Type.
This defines the role or category of the user, such as:
If a user does not already have an account in the system, you will need to create one for them.
To do this, click on the red circular button shown in the image above. This button is used to initiate the creation of a new user account.
The steps shown in the image above guide you through the process of creating a new user in the system. Follow the instructions below carefully:
Step 1: Select User Type
Begin by selecting the User Type.
This defines the role or category of the user, such as:
- Employee
- Customer
- Dealer
- Distributor, etc.
Important
Choosing the correct type helps in managing access and user roles according to business requirements. Step 2: Enter User ID Input a unique User Name for the new user. This ID will serve as their login credential. Step 3: Enter Email Address Provide a valid email address for the user. This will be used for login communication, notifications, and password recovery. Step 4: Check Availability Click the “Check Availability” button to verify if the User Name and email address are available.
- If available, a message will be shown at the bottom of the screen confirming that the user can proceed.
- If not available, the system will display that the username or email is already taken. You will need to modify them and check again. Step 5: Enter Full Name Fill in the user’s full name. This will be displayed across the system wherever the user interacts. Step 6: Enter Contact Number Add the user’s mobile or contact number for communication and reference. Step 7: Set a Strong Password Create a secure password for the user account. The password must meet the following requirements:
- At least one uppercase letter
- At least one lowercase letter
- At least one number
- At least one special character
- Minimum 6 characters in length
Important
Encourage users to use a password that is easy to remember but hard to guess.
Once all steps are completed and all fields are validated. Step 8: click on Save to successfully create the new user account.
Still Facing Issues? Refer to the Flowchart
If you are still facing difficulties while creating a new user, you can refer to the detailed User Creation Flowchart.
This flowchart clearly explains each step of the user creation process in a visual and easy-to-understand format. Where to Find the Flowchart:
- The chart is displayed below on this page for quick reference.
- You can also view or download the chart using the following link:
By following the flowchart, you will be able to:
- Understand each step involved in the user creation process.
- Troubleshoot any common issues you might encounter.
- Ensure smooth and successful user registration.
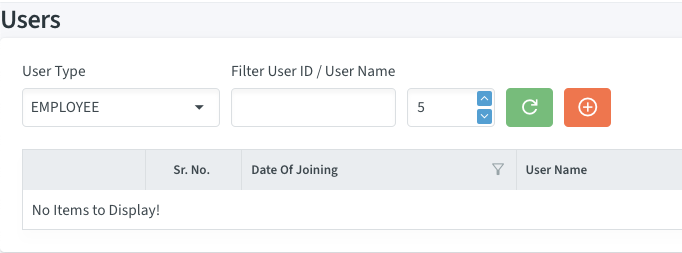
After creating a user account, you can view it in the account list by refreshing the page. To do this, go to the List menu and select the appropriate user type, such as Employee, Customer, Dealer, etc and then click on Click on Refresh Button. This will display all the accounts related to the selected user type.
You can also refer this picture for the better understanding.
Now, the system will display a list of users associated with the selected user type. It is shown in below screenshot.
Once the user list is displayed, you will find additional settings available for each account. These include:
- User Profile
- Roles and Permissions
- Record Permissions
- Business Process Permissions
- Change Password.
To access these options, click on the menu icon marked with a red circle in the screenshot provided below. Once clicked, a dropdown will appear showing all the available settings for that user.
User Profile
The User Profile is a section that contains all essential information and controls related to a specific user in the system. It helps manage and customize the user's access, identity, and role within the application.
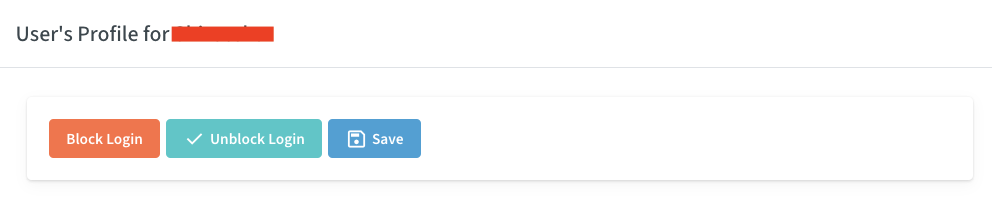
Blocking/Unblocking a User
- This option allows you to temporarily disable or re-enable a user’s access to the system.
- Blocked users will not be able to log in or perform any actions until unblocked.
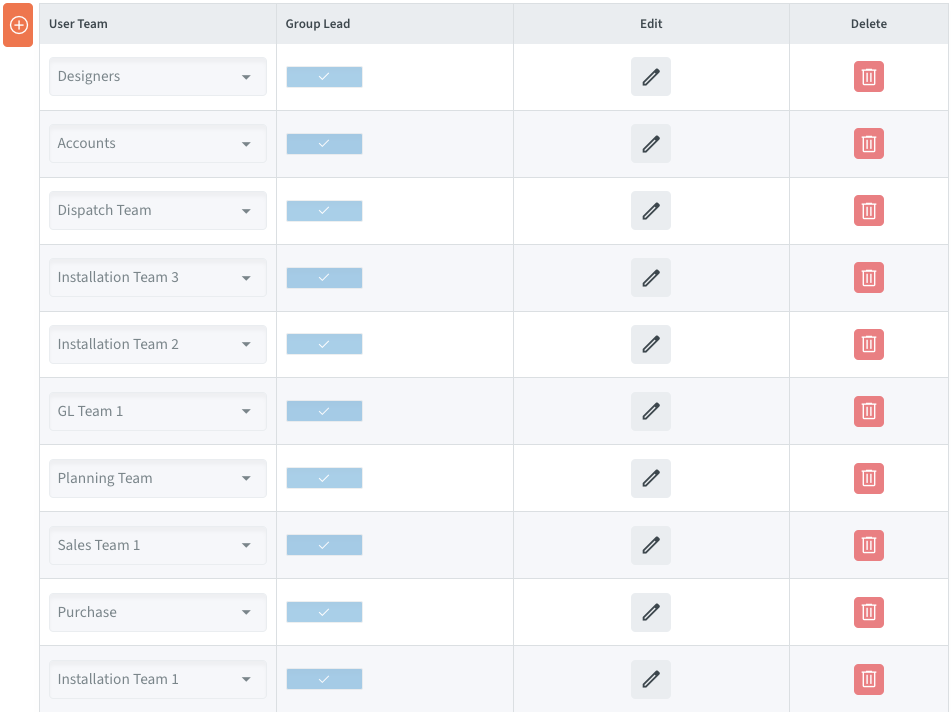
Assigning to Teams and Accounts
Once you have registered a user, you are expected to group him or her into one or several teams which are relevant. There are already such teams generated under different Processes. An example will be that in the Marketing process, a team may be named Mkt Team 2. To have an easy to manage structure, allot working meaningful and practical team names according to the work environment.
- Users can be linked to specific Teams (e.g., Sales Team, Support Team) to ensure proper task allocation and reporting. *Note : For more info :
- They can also be connected to specific Accounts (e.g., Customer Accounts, Supplier Accounts) so that they only view tickets, records, and projects related to those accounts.
Other Fields
- Name: The user’s full name for identification across the system.
- Address: Residential or official address for reference.
- Notes: Any additional details about the user can be saved here for future reference.
Roles and Permissions
These permissions will work as a main gateway to a feature. For example, you will need “manage Records” permission to access any record. Record based permissions like view, add, edit etc will work only if this permission is given.
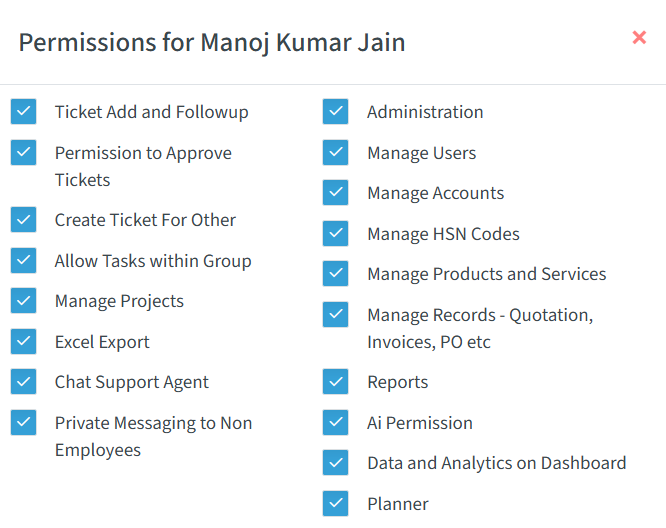
- Ticket Add and Follow-up
This is the most basic and essential permission that must be given to all users. Without this permission, the user will not be able to log in to the application. It acts as the foundation for all other permissions. Any permissions set under “Business Processes”, such as access to tickets, workflows, or tasks, will only work if this basic access permission is enabled.
- Permission to Approve Tickets
This permission is required in addition to the permissions set under the Business Processes menu and any user-specific permissions. It is necessary for users who are responsible for approving tickets or tasks within the workflow. Granting this permission adds an extra layer of security to prevent unauthorized approvals or hacking attempts. Even if a user has access to a business process, they cannot approve any ticket unless this specific approval permission is also enabled.
- Create Ticket for Other
This permission is useful for call centre employees or other support staff who need to create tickets on behalf of users, whether the user is already registered in the system or not. For example, when a customer calls the support team to report an issue, the call centre agent can quickly log the complaint or enquiry in the system using this permission. In some cases, service personnel who are in direct contact with customers can also be given this permission. It helps them raise tickets on behalf of users while on-site or during service visits, ensuring that every issue is recorded properly.
- Allow Advance Ticket List Filter
This permission allows a user to view tasks and tickets assigned to other members of their team or user group. It is especially useful in team-based environments where multiple users may need to collaborate on or follow up with the same customer or task. With this permission enabled, an employee can: - See tickets assigned to other team members - Reply or take action on a ticket on behalf of another team member, if needed (for example, when a teammate is unavailable) Additionally, this permission enables important filters on the Kanban board, such as:
“Within My Group” – to view all tickets related to the user’s team
“Assigned by Me” – to track tasks the user has assigned to others
“Assign to me” – to track the ticket assign to me
- Manage Projects
Users with the Project Management permission can create and manage projects within the system. This includes the ability to view the project list, create new projects, and add tickets to those projects for organized tracking. While small tasks can often be managed using a simple business process along with a Gantt Chart, this permission is useful when a group of related tasks needs to be tracked under a common project. Even with this permission, users will only be able to view the details of tickets within the project if they are part of the assigned team or group. This ensures data privacy and team-based visibility is maintained. This permission is ideal for team leaders, project coordinators, or managers who are responsible for overseeing entire workflows and ensuring that all tasks within a project are progressing smoothly.
- Administration
This permission will show “Administration” Menu and allow all the tasks within Administration menu described earlier.
- Manage Users
Users with the User Management permission will have full access to the Users List and all related options. This includes the ability to create new users, modify existing user profiles, and manage key user settings such as assigning teams and linking accounts (e.g., customer or supplier accounts). In addition to managing profile information, this permission also allows the user to assign roles and permissions, as well as perform administrative actions like changing passwords. This level of access is typically given to system administrators or HR personnel responsible for onboarding and managing user access within the organization. With this permission enabled, the user can ensure that team structures, access levels, and account linkages are properly maintained for smooth operation across the platform.
- Manage Accounts
This permission will allow creating customer and supplier accounts. These accounts will be needed in creating invoices and purchase orders.
- Manage HSN Codes
This permission will allow creating a list of HSN codes.
- Manage Products and Services
This permission will allow managing Products and Services.
- Manage Records – Quotation, Invoices, PO etc.
This permission will allow viewing, creating records such as Quotation, Invoices, PO etc. Additional permission will be required as described next.
- Ai Permission
Allow use of Aitools like ChatGPT (as may be enabled in Site Admin) within application. All these tools require additional license. |
Record Permissions
There are five types of records currently available in the application. You can set View, Add, Edit, Approve, Export, Print and Analyse permissions foreach records.
- Note : Analyse permission will allow you to view analysis in the form of Pie chart or Bar chart as may be designed by you. *
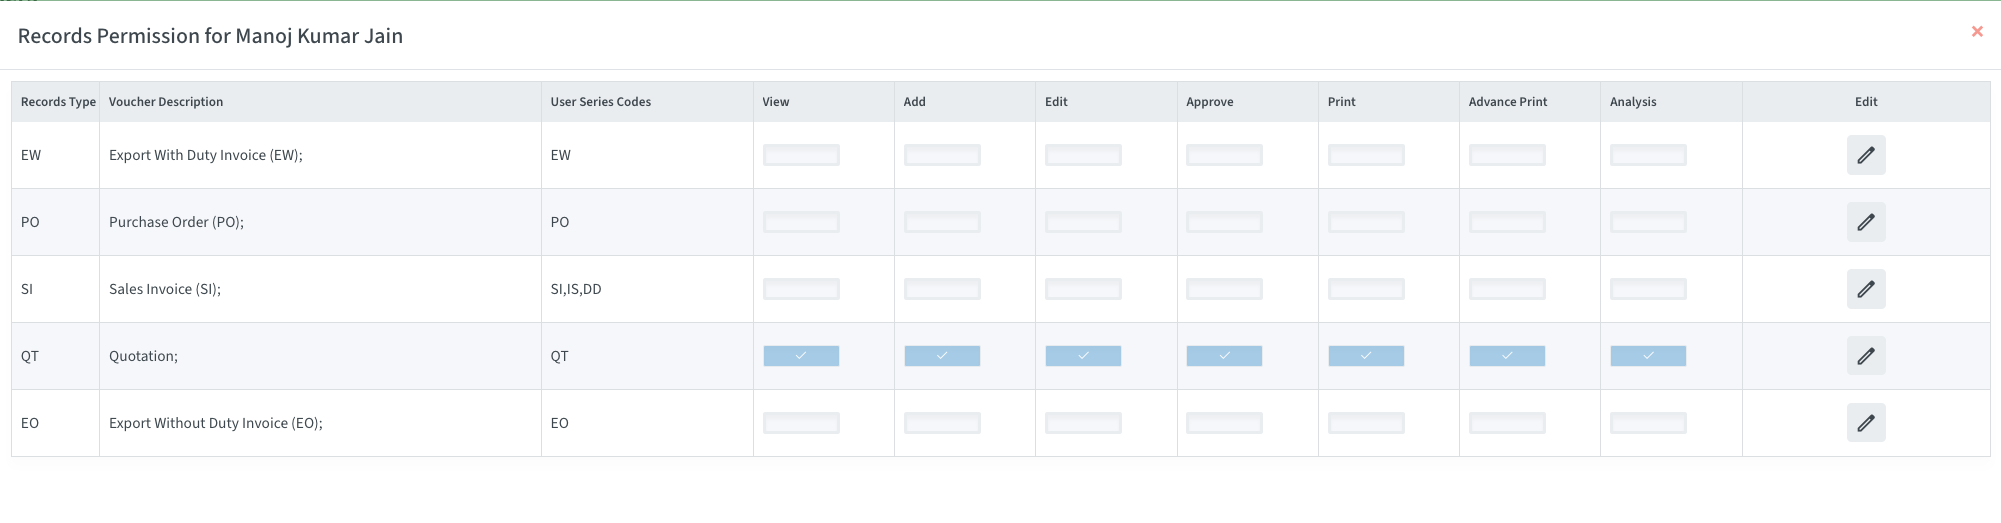
- View Allows you to view the list and view a record.
- Add Allows you to add a new record.
- Edit Allows you to edit an existing record.
- Approve Allows you to approve a record. The approval will be needed if “Records Approval” is set in site administration.
- Print Allows you to view a print preview and print (print includes saving as PDF).
- Advance Print System supports multi-format record printing as well as includes many formats such as packing list, delivery challan etc. You can create as many new formats as required. User having this permission will have access to all the formats. This permission is suitable for employees in marketing and dispatch department. You can create additional formats for agreements etc.
- Analysis This permission will allow you to export and analyse business process data.
Business Process Permissions
This option will allow you to set permissions for business processes only to a specific user. For details see Business process list.
## Change Password

When generating or modifying a user profile, one can enter password manually or can use its system generated password that is randomly generated. In case you select the option of creating a random password, it will be strong and correspond to every necessary requirement (including the presence of upper case letters, lower case letters, numbers, and special characters). After the password is created, it is automatically copied to your clipboard, so you may paste it at the place you want, e.g. in an email, message, or in an onboarding note to share the password with the user. This decreases failure to find an error and wastes time in the course of registering or recreating. The passport feature of the clipboard is the convenience that involves fast and safe operations with passwords without memorizing and typing.
## Accounts The Account List gives a complete list of all the accounts in the system and users can use filters to sort and search fast by type- like Customer, Supplier, Agent, etc. This simplifies the search of given accounts basing on their role or category in your business.
New Account
To create a new financial account or ledger in the system, follow these simple steps:
Step 1 : Click on the “+” button highlighted in the red circle (as shown in the image). This button opens the form to create a new user account.
Step 2: Select the Account Type from the dropdown. Options may include: Employee, Customer, Dealer, Distributor, etc. This helps categorize the user based on their role in your system.
Step 3: Choose the relevant Company Name that the user is associated with.
Step 4: Fill out the remaining fields such as: Country, State, Payment Method and Address etc .
Note
All these fields are self-explanatory and mandatory for account creation.
- Step 5: Click on the Save button to complete account creation.
In order to view or to make any changes in the details of any account, you only need to employ the setting named as the View/ Edit right across all entries of each account. This provides account profile and here all the needed information can be changed or read.

When you click on the red circular button, it allows you to edit or create account details. The fields you will see on the account form are mostly self-explanatory, but here’s what each section includes:
- Account Name – The name of the organization or company.
- Contact Person – The primary person responsible for communication.
- Phone Number & Email – For contact and notification purposes.
- Address – City, State, and Country to identify location.
- Account Type – Choose from options like Customer, Vendor, Dealer, etc.
- GST or Tax Information – If applicable, enter valid GSTIN or Tax ID.
- Notes & Payment Terms – Additional remarks and standard payment conditions.
Properly setting up these account details ensures smooth functioning across the system — from ticket creation and project assignment to invoice generation and order management. It also ensures that users are correctly linked to their respective accounts for seamless operations.
HSN Codes
HSN or Harmonized System of Nomenclature is a universal system of nomenclature of goods classification code. It is mandatory in regard to GST and it assists in systematizing of the product details and taxing rates in the invoices, returns, and audits. You will be able to insert a new HSN code by the corresponding button marked Add and correct an existing one by the Edit button in the system. The process also enhances business efficiency and enables the correct treatment of tax as codes are kept correct.

Product Groups
To add a new Product Group directly on the list, click “Add”; to edit, an existing Product Group, click “Edit”. And as in the case with business processes, and basic processes, you can also define custom fields by each product group. This will enable you to write down certain details that will be common to all items of that type (i.e. parameters such as capacity, color, or power consumption will be quite comparable between all microwave ovens, and the same is true about the washing machines so there will be some consistency, as well as easier organization of data).
Products and Services
Using “View/Edit” option you can view product properties. If you have edit permission, you will see “Save” button also to save the changes. Edit permissions allow modifying product details.
Price List
You can create multiple price lists based on your business needs, with each list becoming active from its effective date. For example, you can maintain one price list for purchases and a different one for sales. To create a new price list, click “Add” and enter the title along with its effective date. Then, click the “Products” option from the dropdown to add products and their respective prices to that price list. This helps manage pricing variations across customers, suppliers, or seasonal changes with ease.
The first time you generate a price list, you can find the button of the auto generation enabled. The feature enables you to come up with a price list very fast by adding each product in the product list to one that is probably to be evenly priced at the initial stage of all products. Once the list has been made you can proceed to copy the prices in turn as required. This approach can significantly speed up the development of a comprehensive price list, moreover, it is very convenient when there is a bulk of products on sale.
Discount List
It will allow you to create separate discount lists which can be used to offer different rates of discounts of different products to different customers according to seasons, and promotions etc. Lists of discounts can contain specific names and individual discount rates on the products chosen. In order to make a new list, one should click the button of addition, and enter the title of the discount list. Next, go to the dropdown and select the option of products to add products and indicate the rate of discounting each of them.
When you are generating a discount list for the first time the button of auto generate will be enabled. This option will make it easy to come up with a discount list by incorporating all the products of the product list at the same single discount rate of applying the discount rates to all products initially. After this list is made, individual modification of discount rates could be done in relation to individual products. This technique greatly declines tedious input and enables you to compose a whole list of discounts with much less time.