Project
- This guide provides a detailed walkthrough of the Projects module. Use these instructions to create, manage, and track your projects, their associated tasks, and timelines using Gantt charts.The Projects menu shows the list of all the projects, to which only the users with appropriate project management access have access. The creation of a new project can be done by supplying the information like title of the project, customer related to the project, start date and end date of the project. There is also the option of closing a project when it has been completed.
Key functionalities include:
- Creating a New Project: You can create a new project by supplying information like the project title, the associated customer, and the project's start and end dates.
- Closing a Project: When a project is finished, you have the option to close it.
- Viewing a Project: Clicking the "View" icon next to a project's name will take you to the project's detail page.This page lists all tickets and tasks that have been associated with the project and shows their current status.
##Add New Project
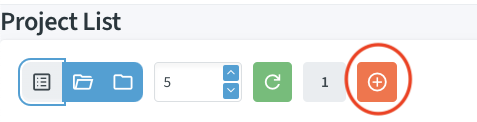
- Click the button with the red-bordered circle to create a new project.

- Fill in all required details such as the Project Title, Customer Name, Start Date, and End Date of the project.
- After entering the details, click on the tick (✔) button to create the project.
User Permission

- Click the button with the red-bordered circle to give user permission.

- Again click on red-bordered circle.
- Choose the user from the list.
- click on the tick (✔) button.
Note
If you want to remove a user’s permission or access from a specific project, you can click on the Delete button to remove that user from the project.

- From the project view, you can perform several actions, such as approving tickets, adding follow-ups, and monitoring progress with a Gantt Chart.These actions use the same familiar interfaces found in the "Tickets" menu for a consistent user experience.
Adding Ticket In project
Once you are viewing a specific project, its details will appear below the main project list. From here, you can manage the tasks associated with it.
Tickets can be added by two ways:
Add Existing ticket
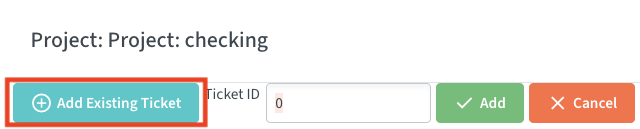
- You can add a ticket that already exists to your project.
- Simply type the ticket ID into the field
- click the "Add" button.
Add a New Ticket to Project
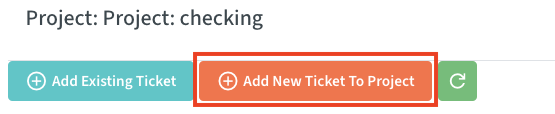
- This function works the same way as adding a regular ticket.
- *Task Approval and Follow-up: To approve or follow up on a task, click the button in the "Follow-up" column.If the task has not been approved yet, the approval form will be displayed.Otherwise, the standard task follow-up form will appear.
Note
For managing tickets, you can refer to the Ticket section.This section will help you understand how tickets work, including creation, approval, follow-up, and other important actions related to tickets.
How to Create a Gantt Chart

- The system allows you to create Gantt charts to visually plan and track your project's execution. The interface is split into two main tabs:
- *Original Message: This tab lets you view complete details related to all tickets under the project, including requester information.
- *Create Project Flow: This is where you can design and generate a Gantt Chart for your project.
Generating and Saving Your Chart
- Set Up the Project Flow: In the "Create Project Flow" tab, select the appropriate workflow and fill in the required project details such as start and end dates.You can also define other important parameters like team assignments and activity types.Most fields are self-explanatory.
- Generate the Chart: Once the setup is complete, click the Generate button to create the initial Gantt chart.
- Save the Chart: You can make adjustments to the chart as needed and then click Save to store it.The chart will be saved with the selected date and time, or the current date and time if none is specified.
Managing Chart Versions
- The system maintains a history of your saved Gantt charts.
- When you return to this section later and click the generate button again, a history of all saved versions of the chart will be displayed.
- You can load any previous version to review past plans.
- If you make changes, you can save it again as the latest version.
- This versioning allows you to track the progress and changes of the project over time and maintain a clear log for future reference.